

Table of Contents
- Why Farm Gear Protection Matters Before the First Freeze
- Step 1: Winterizing Farm Machinery Checklist for Cold Months
- Step 2: Best Rust Prevention for Farm Equipment Exposed to Rain and Snow
- Step 3: How to Waterproof Canvas Tarps Safely for Outdoor Storage
- Step 4: Leather and Tack Protection for Ranchers and Hobby Farmers
- Step 5: Shelter, Windbreaks, and Site Drainage for Gear Storage
- Step 6: Digital Monitoring and Smart Farm Protection Tools
- Step 7: Insurance Documentation and Emergency Preparedness
- Frequently Asked Questions
Last Updated: September 17, 2026
Why Farm Gear Protection Matters Before the First Freeze
Protecting farm gear from harsh weather starts long before the first storm hits. It is the practice of preparing equipment, leather, canvas, and structures so cold, moisture, and wind cannot quietly destroy them. At Ole Time Woodsman, we have watched outdoor gear fail for over 140 years, and the pattern never changes: the damage happens slowly, then all at once.

Step 1: Winterizing Farm Machinery Checklist for Cold Months
Winterizing farm machinery means replacing old fluids, stabilizing fuel, and protecting batteries before temperatures drop. Skipping this step is the fastest way to crack an engine block.
Start with a simple checklist:
- Test antifreeze with a hydrometer and top off as needed
- Change oil and filters before storage
- Check battery charge and clean terminals
- Add fuel stabilizer and run the engine briefly
- Grease all fittings and exposed joints
Fluid Levels, Antifreeze, and Battery Care
Antifreeze does two jobs: it stops freezing and it prevents rust inside the cooling system. A weak mix fails at both. Check the owner's manual for the right ratio, and never top off a cold engine with water alone.
Fuel Stabilization and Engine Storage
Old fuel gums up carburetors and fuel lines. Add stabilizer, run the engine for a few minutes, then store equipment with a full tank to reduce condensation.
Step 2: Best Rust Prevention for Farm Equipment Exposed to Rain and Snow
The best rust prevention for farm equipment combines protective coatings, lubricants, and dry storage. No single product does everything, and the right choice depends on what the metal touches, how long it sits, and how much moisture the storage area holds.
Matching the Coating to the Exposure
Different coatings fail in different ways, so match the product to the job:
- Oil and grease films, Best for chains, linkages, plow shares, and any surface that moves or gets handled. They self-heal when scratched but wash off with rain and need reapplication. A pure, additive-free oil that stays put across temperature swings is the right pick for tools and firearms stored through winter.
- Wax-based coatings, Best for long-term storage of machined surfaces, moldboards, and cutting edges. They go on thick, resist wash-off better than oil, and wipe clean with solvent before the equipment goes back to work.
- Paint and powder coat, Best for stationary frames, trailers, and implements that don't flex. Once chipped, rust creeps under the edge, so touch up chips the same season they appear.
- Galvanizing, Best for anything that lives outdoors year-round: gates, posts, feeders, and fencing hardware. The zinc sacrifices itself before the steel does, which is why galvanized parts outlast painted ones in wet climates.
Moisture Control and Ventilation in Storage Areas
Trapped moisture causes more rust than rain. A sealed, unventilated shed is worse than an open lean-to, because warm daytime air carries water vapor in, then condenses on cold metal overnight. The fix is airflow, not airtightness.
Practical steps that make a measurable difference:
- Keep air moving through barns and sheds with ridge vents, gable vents, or a small exhaust fan on a timer.
- Raise equipment off dirt floors using pallets, cribbing, or concrete pads. Dirt wicks groundwater straight into steel.
- Run a cheap hygrometer in the storage area. If relative humidity stays above roughly 60 percent, add ventilation or a desiccant before you add more coatings.
- Park equipment with the exhaust and intake covered so rodents and moisture don't nest in the engine bay.
- Never store wet tarps, wet rope, or damp hay against metal, they hold water against the surface for weeks.
A Simple Seasonal Routine
Twice a year, once before the wet season and once before winter storage, walk the equipment line and do the same four things: wash off mud and manure, let everything dry fully, inspect for chipped paint and exposed metal, then re-coat. Ten minutes per implement beats a full teardown in spring.
Step 3: How to Waterproof Canvas Tarps Safely for Outdoor Storage
To waterproof canvas tarps safely, apply a natural wax coating in thin, even layers and heat it into the fabric. This keeps water out without trapping moisture that rots the cloth. Canvas breathes, plastic does not.
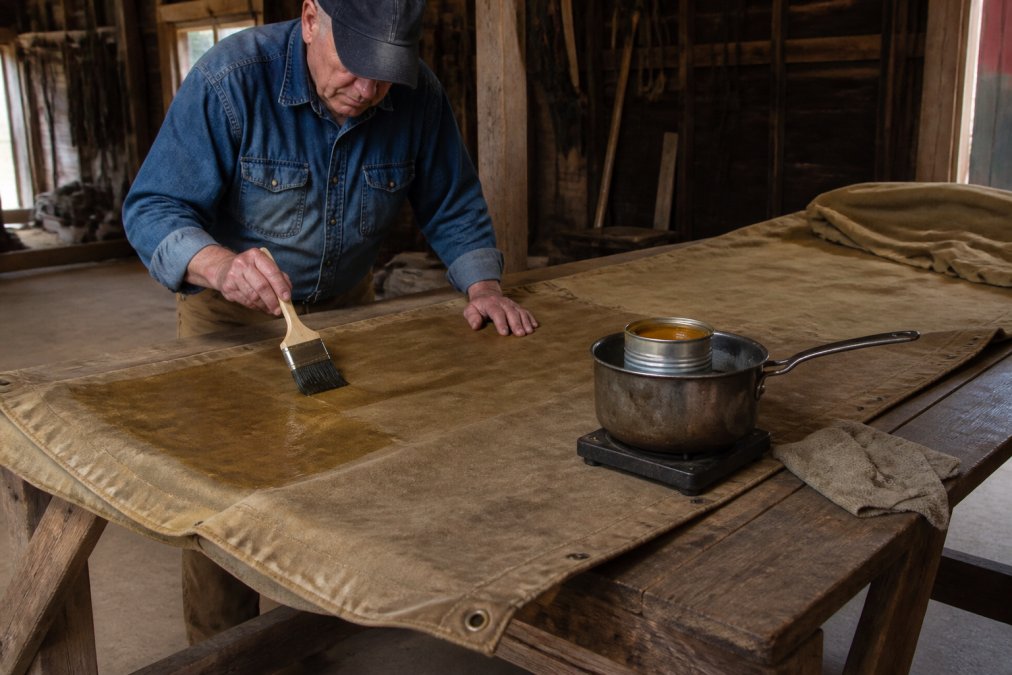
Here is how to apply it:
- Melt the wax by placing the can in a saucepan of water on the stove
- Apply generously with an ordinary paintbrush
- When the wax dries white, heat it with a hair dryer to set it into the fabric
- Touch up once a year to keep gear waterproof
Applying Oilskin Wax to Canvas and Cotton Gear
Spread the garment or tarp flat so the wax goes on evenly. Pay extra attention to seams, corners, and any spot that rubs. Let each coat set before adding the next.
Step 4: Leather and Tack Protection for Ranchers and Hobby Farmers
Leather is animal skin, so it needs feeding, not just cleaning. Dry leather cracks, and cracked stitching rots. The fix is simple: use products made from natural ingredients that match leather's own makeup.
Routine care matters more than any single product:
- Wipe off mud and manure before it dries
- Let wet leather dry away from direct heat
- Apply grease to saddles, boots, and straps before winter
- Check stitching on tack for weak spots
Step 5: Shelter, Windbreaks, and Site Drainage for Gear Storage
Good shelter and drainage protect gear better than any coating. Water that pools around a shed will find its way inside, and wind drives rain into every gap. The goal is not to build a fortress, it is to interrupt the three ways weather reaches your equipment: falling water, standing water, and wind-driven water.
Sizing a Shelter to the Equipment
A shelter that is too small forces you to stack gear against the walls, which traps moisture and blocks airflow. Plan for at least two feet of clearance on every side of the largest piece of equipment, plus room to walk around it. For a compact tractor with a loader, that usually means a footprint of roughly 20 by 24 feet.
Windbreaks That Actually Cut Wind
A solid wall stops wind but creates turbulence on the downwind side that can be worse than the wind itself. A porous barrier, one that lets roughly half the wind through, is more effective because it slows the wind instead of splitting it.
Options that work at farm scale:
- Slatted snow fence, The classic solution. Set it perpendicular to prevailing wind, roughly 50 feet upwind of the equipment or building it protects. The protected zone extends downwind about 10 to 15 times the fence height.
- Stacked round bales, Cheap and effective if you have them. Stack two high and leave small gaps between bales so the wall breathes.
- Evergreen hedgerows, The long-term answer. A double row of conifers, spaced about 6 to 8 feet apart, takes several years to establish but lasts decades and needs no maintenance.
- Temporary panels, Plywood or corrugated metal panels on T-posts work for a single season and can be moved as your layout changes.
Site Drainage: Where Water Goes Matters
Water that pools around a shed will find its way inside, usually at the base of the wall where the sill plate sits. The fix is to move water away from the building before it has a chance to soak in.
- Grade the ground so it slopes away from buildings at roughly a 2 to 5 percent fall, about a quarter inch to a half inch per foot.
- Add a gravel apron at least 12 inches wide around the base of any shed, and dig it a few inches below the surrounding grade so it acts as a French drain.
- Clear gutters, downspouts, and ditches before the rainy season. A single clogged downspout can dump hundreds of gallons against a foundation in one storm.
- Keep vents open for airflow, and never seal a shed so tight that condensation forms inside. A shed that stays dry but stuffy will rust tools faster than one that breathes.
- If the site floods regularly, raise the floor of the shed on a gravel pad or concrete slab rather than fighting the water at grade.
A Quick Pre-Season Walkthrough
Before the first storm of the season, walk the property and check four things: does water flow away from every building, is the windbreak still standing and porous, is there clearance around stored equipment, and is the interior of each shed dry to the touch. Fixing those four items takes an afternoon and prevents most of the damage coatings alone cannot stop.
Step 6: Digital Monitoring and Smart Farm Protection Tools
Digital monitoring is the angle most guides skip. Simple sensors now track temperature, humidity, and water leaks in barns and storage sheds, sending alerts to your phone before damage spreads. A basic temperature and humidity monitor costs little and tells you whether your storage space is actually dry. For livestock, remote cameras and heat sensors help you spot cold stress or a downed animal during a storm without walking the whole property.
Step 7: Insurance Documentation and Emergency Preparedness
Documentation is the step almost everyone forgets. Take dated photos of equipment, buildings, and livestock before storm season. Keep receipts and serial numbers in one folder, and store a copy off-site or in the cloud. Review your policy to confirm what is covered for storm, flood, and freeze damage.
Build an emergency kit for your farm:
- Backup generator and fuel
- Flashlights and batteries
- First aid supplies and any livestock medication
- Bottled water and non-perishable food
- Copies of insurance and contact documents
| Step | What It Protects | When to Do It |
|---|---|---|
| Winterize machinery | Engines, fuel systems | Before first freeze |
| Rust prevention | Tools, metal parts | Before wet season |
| Oilskin wax | Canvas, cotton gear | Annually |
| Leather care | Boots, saddles, tack | Before winter |
| Shelter and drainage | Buildings, stored gear | Fall |
| Digital monitoring | Barns, livestock | Year-round |
| Insurance records | Everything | Before storm season |
Frequently Asked Questions
What are the best materials for covering farm gear to prevent moisture damage?
Canvas and cotton covers work best because they allow some airflow while repelling water when treated properly. Canvas treated with oilskin wax creates a waterproof barrier that prevents moisture from reaching equipment while still letting trapped humidity escape. Avoid plastic tarps for long-term storage since they trap condensation against metal surfaces and accelerate rust. For leather items like saddles and boots, use a tallow and beeswax-based grease that conditions while it protects. Ole Time Woodsman Oilskin Wax uses natural beeswax, fish oil, beef tallow, and pine resin to waterproof canvas, cotton, hats, tents, and bags.

How often should you apply protective coatings to farm equipment?
Most protective coatings need reapplication annually, ideally in early fall before winter sets in. Oilskin wax on canvas garments and tarps holds up through a season of use but benefits from a touch-up each year to maintain waterproofing. Leather boot grease and saddle treatments should be applied whenever leather looks dry or after heavy exposure to mud and wet conditions. For metal surfaces, inspect for rust every few months and spot-treat any areas where the coating has worn thin. Equipment stored outdoors may need more frequent attention than gear kept in a barn.
How do you prevent rust on outdoor farm machinery during winter?
Start by cleaning all exposed metal surfaces to remove dirt, grease, and any existing rust spots. Apply a penetrating oil or protective coating to create a barrier against moisture. Ole Time Woodsman Original Formula Gun Oil prevents rust, tarnish, and corrosion on firearms, fishing tackle, and fine equipment, and it will not gum, stick, or run in high or low temperatures. Store machinery under cover when possible, elevate it off bare ground, and ensure good ventilation to reduce condensation. Check coated surfaces monthly and touch up any areas where the coating has thinned.
How to waterproof canvas tarps safely without damaging the fabric?
Melt oilskin wax by placing the can in a saucepan of water on a stove, then apply it generously to the canvas with an ordinary paintbrush. When the wax dries to a white color, heat it with a hair dryer to set it as it disappears into the fabric. This method works on canvas tarps, tents, slickers, barn coats, and bags. The natural formula of beeswax, fish oil, beef tallow, and pine resin conditions the fabric while making it waterproof. Reapply annually for continued protection.
Harsh weather will test every piece of gear you own. Ole Time Woodsman has helped ranchers, farmers, and outdoors people protect leather, canvas, and tools since 1882, using original formulas built on beeswax, tallow, cod oil, and pine resin. Start with our Oilskin Wax for canvas and cotton, our Boot Grease for leather, and our Gun Oil for metal. Get started with Ole Time Woodsman and keep your farm gear ready for whatever the season brings.